
Lately I’ve been shooting a lot of panoramas – particularly in a 2:1 ratio – for several reasons:
- They look great printed and offer a resolution that can print at a massive scale
- They look great online
- They offer something a little bit different from the norm
Those of you that have been following me and my blog for some time, no doubt know how much I also like to shoot long exposures. Given these two preferences, it was only natural to combined them to create long exposure (LE) panoramas. While these LE pano’s look great, they pose a number of challenges that are less problematic when dealing with single image captures. For more details on shooting long exposures please visit this post.
Missing the moment
The most difficult part is simply the amount of time involved in creating them, with the time required to complete one long exposure now being multiplied by the number of frames you’re shooting. For example, I’ll often shoot in the 5-7 minute range for one frame, which translates to as much as 21 minutes on a mere three image panorama. The obvious problem is that while you’re try to achieve a great pano, you end up getting nothing. Those that are accustomed to long exposures will know that nailing the right exposure is often a guessing game since you’re not working with your in camera meter and simple multiplication of f-stop’s doesn’t necessarily yield a correct result. Given this guessing game, long exposures are a gamble on a single frame, but border on crazy with multiple frames. You could spend enough time fiddling with your settings and chasing the light that before you know it, the scene is gone and you missed the moment altogether.
Matching light and position
The other challenge is the simple fact that the sky itself is moving and the light is changing. If each exposure is a couple of minutes and the sky is moving across the image (as opposed to towards the camera) then the same patch of clouds will show up in different areas of the panorama images and the blended sky won’t stitch together easily. Finally, five minutes is more than enough time for the light to completely change during sunrise or sunset, so the exposure times needed will vary from frame to frame and your light temperature (white balance) will do so as well.
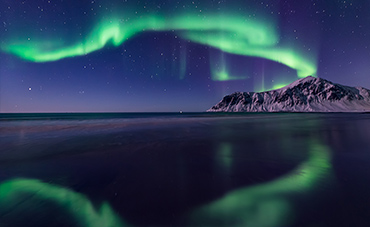
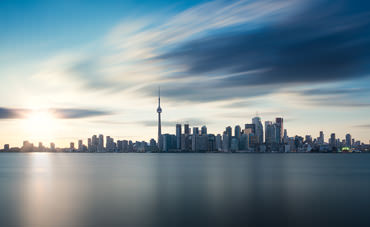
Experimenting – The Toronto skyline
During an outing last week, I faced all of the above challenges and decided to experiment with a few solutions. The image at the start of this post is a sample of one of the shots that I captured that day.
Given the rapid left to right cloud movement and changing light, I knew that if I simply took the standard approach of shooting three or four images, I would end up with a patchwork images, all with different contrast levels, exposures and choppy skies. I therefore decided to experiment with a partial panorama approach that would work around a lot of these issues. In the case of the above frame, we really only have two areas that are affected by the long exposure, the sky and the water. Both elements are nicely isolated from the static elements and I didn’t require a particularly wide field of view. As a result, what I ended up doing was first shooting the entire scene at 24mm, then shooting a standard set of bracketed exposures going across frame for the buildings using a 50mm prime. I ended up shooting two long exposures in the same position (6 minutes each) to create a combined long exposure effect of twelve minutes (see below original samples). The buildings were shot using three vertical images going horizontally, each bracketed at three stops without any long exposure applied.

In post processing, I blended the two long exposures to establish a base image, which I then blew up around 40% to 10,000px in width using Photoshop CC’s intelligent up-sampling and cropped it down to a 2:1 ratio. Given that the only fragments that would be used from these images were the sky and water, which were already blurred, up-sampling had no detrimental effect on the image quality. Once this was done, I manually aligned and stitched together the three exposures of the buildings which resulted in a nice detail rich image, right where it counts. The final image actually contains many more exposures for various details so please see the section below for the full edit details. The basic idea with this approach is to shoot the motion component in one frame but capture the details with many. While this worked perfectly for me here, it does have a few limitations:
- Your field of view may exceed the widest focal length of your lens (this is often why you shoot pano’s after all). In this case it’s still easier to shoot 2 (maybe 3) sky images rather than 6 or 8. In this case you blend the two skies together, then blend the static images in after.
- Your delineation between static and moving objects may not be clear. If you had moving trees in the frame that encroached into the sky or water, this technique will result in a nightmare when trying to blend the static and moving elements.
- It’s not for the faint of heart. The edit can take anywhere from three to ten hours to complete depending on the number of exposures so you better have one beautiful scene to justify the time involved.
- The manual stitching can be difficult if there are elements that are close to the camera (thus heavily distorted from frame to frame) so it’s best to only use this when all elements of the scene are distant from the camera.
While this isn’t a one size fits all solution to shooting long exposure panoramas, my goal was to encourage a new way of thinking when shooting such images and really harness the possibilities that we have in post processing and use some more novel approaches to get to our final result. In the next post we will look at a photo I shot during blue hour using the standard panoramic approach and explore some techniques to help you overcome limitations there.
Image details
In addition to the above techniques, here are some details on this photo:
Camera: Nikon D800
Lenses: Nikon 24-70mm f2.8, Nikon 50mm f1.4
Filters: B+W ND110, Nikon Polarizer (12 stops of light blocking in total)
Long exposure: ISO50, f/22, 300sec, 24mm
Base exposure for buildings (two more images at -1ev and +1ev): ISO100, f/7, 1/2 sec, 50mm
Starburst exposure: ISO400, f/22, 30sec, 24mm (with B+W ND110)
In total, 12 images were used including photos for the starburst on the sun, multiple highlight images for the buildings, 1 for water highlights and of course the ones mentioned above. The exposures were taken over a 40 minute period from 35 minutes before sunset to 5 minutes after sunset. Apart from a massive amount of blending, the remainder of the edit was just my standard workflow of sharpening with high pass layers, contrast adjustment with Nik Color Efex, dodging and burning and selective exposure adjustment with curves adjustment layers.
Be sure to check out part 2 of this post for more information.