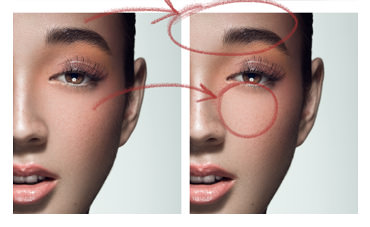

This is the second in a two part tutorial on retouching outdoor portraits and retaining a natural look using Adobe Photoshop. In the first part we looked at fixing hair and making the skin look great using frequency separation and dodging and burning. In this part we will be finishing the image with sharpening, toning, refining details like the eyes and hair as well as adding some styling elements like bokeh and lens flare. The final result is shown above.
The tutorial is beginner to intermediate in nature and I try to cover every technique in a step-by-step manner. Just about all the tools we’ll be using in this tutorial are available in Photoshop CS3 and onward. We won’t be using any plug-ins.
In this video we will spend a fair bit of time on adjusting the colours in the image so you may want to first review our tutorial on Mastering Color Adjustments before watching this one. If you’ve not yet watched part 1, it can be found here.
Thanks for watching and don’t forget to subscribe to my YouTube channel for more updates!