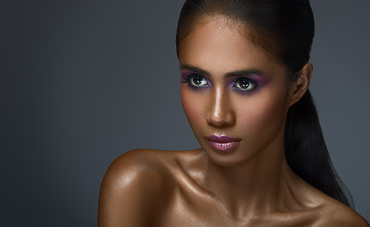
As a complement to my previous posts on beauty photography (part 1, part 2), I thought I’d further elaborate by going over a real life example from a shoot I did last week. This one is also made a little bit more interesting by virtue of the fact that I got to work with a dark skin model, which has subtle impacts on both the lighting and retouching processes.

The above image is one of the shots taken during the shoot (higher resolution version can be found in my portfolio) and will serve as the basis for the remainder of this post.
Lighting and Camera Settings
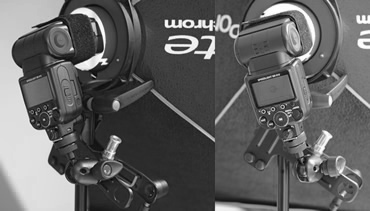
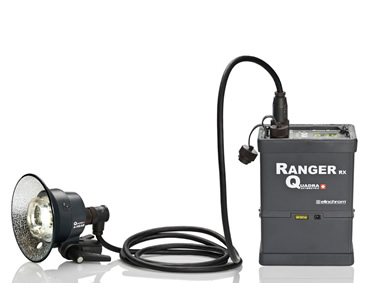
Lighting was a variation of the commonly used clamshell approach. While clamshell lighting typically involves a light source from above and one from below (or a reflector below), or alternatively from side to side, here I used two Elinchrom strip lights in a V-shape from the bottom as opposed to just a single source (as seen in the lighting diagram below). The main light was a white, 17″ Elinchrom beauty dish with a 30 degree on it to focus the light and add extra contrast. Using a fairly hard light source like this has its advantages and drawbacks. On the plus side it helps to accentuate skin texture, creates nice spectral highlights (especially in dark skin models) and produces a good deal of contrast. The downside is that it will also bring out any imperfections and requires a lot of fine tuning, as even small changes in direction can drastically alter the resulting light on your subject. It’s certainly not a light source you would want to use for a portrait of a middle aged business woman for her LinkedIn profile, but for beauty shots and sports portraiture it can deliver a nice result. The choice of two strip lights from below was driven by the desire for a more wrapping fill light, as well as to produce a more interesting catchlight. All three strobes were 400ws Elinchrom heads with the main set at 2/3 power and each of the fill lights set to 1/3.

Camera settings and gear were pretty standard for what you would typically use in beauty photography. A Nikon 70-200mm f2.8 VRII lens @120mm was used to give a nice facial compression while the D800 gives me a nice detail rich file to work off of. Exposure settings were ISO100, 1/250th, f/10 which provided about a half a stop of under-exposure given the lighting settings. I under exposed in order to preserve highlights and ensure that there were no areas of the skin that were blown out. Dark skin models tend to have a fairly reflective skin surface so over lighting can quickly produce unrecoverable areas. Finally to ensure maximum sharpness and detail (and to save my arm from falling off), the camera was mounted on a tripod and set to the models head height.
Post Processing
I remember when I first started out and looked at flawless retouched beauty images, I was convinced that there was some magic trick that professional retouchers used but didn’t tell us that achieved their signature, clean and refined commercial look.  Over time I came to realize that the only trick being used is patience, and lots of it. The crucial element to a good beauty retouch is preserving skin texture, and furthermore enhancing it. The sample you see on the left is a 100% crop of a tiny fragment of the models cheek and is intended to show you the degree of texture that should be present in the final image. As you can imagine, this at no point involves softening the skin using blurring techniques or quick fix plug-ins like Portrait Professional. While those approaches may work OK for certain types of photography, there is no room for them in beauty photography. There were no mysterious techniques involved in achieving this level of texture, in fact all of the tools that I used to retouch this image have been demonstrated at one point or another on my YouTube channel with some specific links provided below. In the case of this image, my workflow went something like this:
- Use the liquify tool to enhance body lines and fix bumps in the hair
- Clean up the skin using spot healing brush, then healing brush, then the clone stamp tool. Always use the clone stamp tool at close to 100% opacity to prevent blurring. Do this until all small blemishes are removed and don’t worry about larger discolourations (this will be fixed later).
- Clean up stray hairs and fly-aways with clone stamp tool and spot healing brush, patience is a virtue here.
- Cut out the entire subject with the pen tool, make a selection and then refine the selection using the ‘refine edge’ tool to select individual hairs. This is important so that we can operate on the subject and the background independently, so save the selection for later use.
- Even out skin tone, exposure and fix the make-up with frequency separation, see this tutorial for a demonstration.
- Brighten the eyes with a curves adjustment and make the lip line perfect by cutting out the lips using the pen tool and using the clone-stamp tool on the inside and outside of the lips.
- Enhance contrast and facial features with dodging and burning
- Tone the image through a variety of colour adjustment tools including a black and white layer with soft light blend mode, selective colour, and curves adjustments. Separate adjustments were made to the subject and the background thanks to the cut-out mask we made earlier.
- Sharpen the image using two frequency separation sharpening layers as demonstrated in the linked video.
- Output sharpen as shown in the above video
The entire retouch took around 6-7 hours which is fairly standard for a beauty shot. You may want to take a look at my Natural Outdoor Portrait Retouch tutorial (part 1 and part 2) as the workflow for both is similar, but taken to the extreme and much more detailed in the case of a beauty shot. One advantage of having a dark skin model in your retouch is that you can create a much higher degree of contrast and really make the spectral highlights pop without it looking over the top. Furthermore, you can experiment with some interesting colour overlays on the skin tone to achieve a nice golden colour. As I’ve said before, beauty retouching is nothing more than good portrait retouching techniques taken to a really fine grained level until perfection is achieved. There is no mystery to it, only patience and time.