As an extension of our previous long exposure panorama techniques article where we took a more unique approach to overcoming some of the challenges that exist, here we’ll talk about the more traditional method and how to mitigate some of the problems you’ll face.

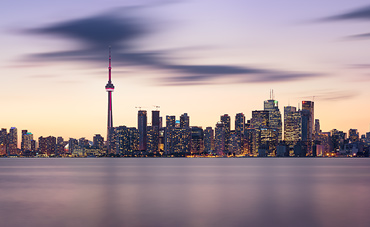
As mentioned in part 1, long exposure panoramas pose a unique set of challenges, particularly when shooting at sunrise or sunset. We have to deal with not only changing light conditions but also a moving sky that makes stitching quite a challenge. In part 1 we overcame some of these problems by taking a single long exposure of the moving features such as the sky and water, and then taking panoramic shots of the details like the buildings and blending it all together. Here I opted for a standard three long-exposure image approach for all the elements, then three more short exposures for the buildings lights once they came on. There is no particular reason why I shot this image in this manner and the previous one as described, I simply wanted to experiment with both options and see what works best. Here’s what I discovered over the course of this experiment.
Find your Starting Point
Given that the bulk of the visual interest was in the middle, I opted to shoot it first, then shot the left, then right frames. The majority of the cloud was there and I wanted to capture it when the light was best. While this sounded good in theory, in practice it caused a problem with cloud position once I began to blend the exposures. Because the clouds were moving left to right, by the time I shot the left frame, the left edge of the main cloud had largely escaped into the middle frame, leaving me with a sharp line on the middle frame that I couldn’t easily complete. I had to resort to a fair bit of clone, transform and mask trickery to re-create the cloud edge which is ultimately wasted time. My advice here is to always photograph in the direction of the cloud movement. Note that if the clouds are moving towards or away from you this problem doesn’t exist and the blend is actually quite simple regardless of what order you shoot in.
Opt for a Conservative Shutter Speed
Starting with the middle, I went for a very long exposure of nearly 7 minutes to get a good deal of blur in the sky which turned out to be a mistake. While the 7 minute exposure looked great in the end, it ate up a good deal of time and I had to deal with a drastically different light temperature once I moved to my left and right frames. Having noticed this change I reduced my exposure time to around 3.5 minutes and compensated with a larger aperture for the remaining frames. In hindsight, around 2 minutes for all three images would have been a sufficient exposure time. It would allow enough time to smooth out the water, and given the clean separation of land and sky, I could have applied additional blur to the sky via a motion blur or radial blur filter in Photoshop to compensate. This would have reduced the issues with light temperature and exposure variance and made the final colour matching a lot easier. In a nutshell, don’t overdo the exposure time and try to capture all your frames in no more than a 10 minute time period (ideally less) whenever you’re shooting at sunrise or sunset.
Get Comfortable with Manual Blending
With moving skies, blending using automated tools tends to produce relatively poor results which is why I generally blend these panoramas manually using layer masks. Once you get the images relatively well aligned the next step is to use the free transform tool, to correct any perspective issues that may exist from frame to frame, the extent of which will vary depending on whether a nodal point slide was used or not. In this case I didn’t use a nodal slide as the subject was at a far distance from the camera so perspective corrections remained minimal but if you have one, use it. With the alignment out of the way you can take care of color and exposure variances using curves adjustments and then it’s just a matter of finding suitable blend points and using masks to hide the unnecessary parts of each slice. The best blend points are simply areas that transition well into one another, or contain very little detail which makes it easier to feather the transition together using a soft mask. I’m sure I’ll be demonstrating this process in a future tutorial so follow us on Facebook or subscribe to our YouTube channel to get notifications on that.
Have Patience
No matter how you slice it, blending these exposures together into a seamless image is still a daunting task so plenty of patience is needed. In the case of the above image, the real challenge came about when I had to blend in the three short exposures for the building lights which were completely mis-aligned and had to be manually overlaid using free transform tools. The whole edit took over 10 hours so it’s not a project for those looking to minimize their post processing time.
In a Perfect World
If cost was no issue and we had an unlimited supply of gear, a few things would help to simplify the process. The first is a nodal slide with a panorama plate such as this one from Really Right Stuff. With this piece of gear you can make note of the specific angle (degree) used for each exposure and quickly return to those position when shooting the building light exposures. This will save you a tremendous amount of time aligning the images together, and after my experience with it, you can bet that this is the next item on my wishlist. Another thing this is useful for is that you can pre-plan the amount of rotation degrees needed for each frame prior to installing the 10 stop ND filter, thus eliminating visibility issues once the 10 stop is on, as well as reducing the amount of time needed between frames. The next useful tool is either a second camera or a light meter. This will allow you to measure the amount of reflected light between each of your long exposures, and adjust the shutter speed or aperture on the fly to compensate for it. In my case I didn’t have either so I guessed at a half a stop difference for my last frame, when in reality about a full stop was needed. You could take the 10 stop filter off and measure using the in-camera meter but taking the filter on and off and juggling camera settings like this can often lead to more errors and problems than it actually solves and wastes precious time. If you don’t have another camera or a light meter, go for a change of +1/2 stop every 4 minutes just after sunset, or -1/2 for every 4 minutes before sunrise.
Get There Early
Post processing prowess and fancy kit is never a substitute for careful planning. Getting to your location early and giving yourself lots of time to plan is essential. Once the optimal light starts to shine you have to have your game plan ready so you don’t waste any time fiddling around. Your preparation process should go like this:
- Determine your focal length, composition, and mark your rotation (degree) points in advance so that you can quickly re-create them once your ND filter is on. To do this well you really do need the pano kit I discussed above, or at minimum a ball head with a degree of rotation indicator on it.
- About 40 minutes prior, start testing the cloud movement and overall long exposure conditions to find a suitable shutter speed. As mentioned, keep it as low as possible but long enough to create a dramatic enough effect. Consider whether the effect can be exaggerated in post processing to save precious capture time.
- As soon as the sun hides behind the horizon, put on the ND filter and take a shot at ISO 400, f/5.6 for 30 seconds. Review it on the screen and the histogram to check if your exposure is good. If it’s way off, adjust one or two stops up or down and take another test. Once it looks good, drop your ISO back to 100 (that’s 2 stops), then increase or decrease the aperture by the number of stops needed to achieve the ideal shutter speed you calculated earlier. For example, if we need to get to 2 minutes, we would simply drop to ISO 100 (down 2 two stops), then up two stops from 30 seconds to 2 minutes. If we needed 4 minutes we could increase to f/7, ISO 100 or stay at f/5.6 and go down to ISO 50 (if you have it). As you can see, quickly calculating f-stops in your head is another essential skill here.
Image details
In addition to the above techniques, here are some details on this photo:
Camera: Nikon D800
Lenses: Nikon 24-70mm f2.8, Nikon 50mm f1.4
Filters: B+W ND110
Long exposure middle: ISO100, f/11, 400 seconds, 58mm
Long exposure left: ISO100, f/7, 200 seconds, 58mm
Long exposure right: ISO100, f/6.3, 200 seconds, 58mm
Exposure for building lights: ISO200, f/7, 1.5 sec, 58mm
In total, 6 images were used and the exposures were taken over a 40 minute period, with 13 minutes to get the long exposures and then a 25 minute break before the lights came on. Apart from the manual panorama stitching and exposure blending, the remainder of the edit was quite simple. I made a number of tonal adjustments to the water and sky, applied some curves adjustments using radial and linear gradient masks to the sky and water, dodged and burned some of the buildings, and sharpened using a few high pass filter layers. Final output sharpening was done with the Smart Sharpen filter in Photoshop CC.
As you can see, long exposure panoramas offer a lot of room for experimentation and can produce really nice results, but they do require you to be prepared and familiar with the technical details of shooting standard panoramas and standard long exposures. It’s essentially long exposure images and panorama images taken to the extreme.
