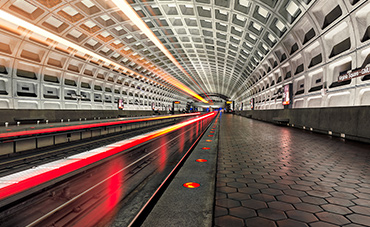
 High density ND filters like the 6 or 10 stop are a great way to add creative motion effects to architectural or landscape images, but there are some important considerations for those looking to experiment with them. Ultimately the creativity they afford the user come at the price of convenience and consistency, so my goal here is to help you choose a filter that’s right for you and give you some tips on using them.
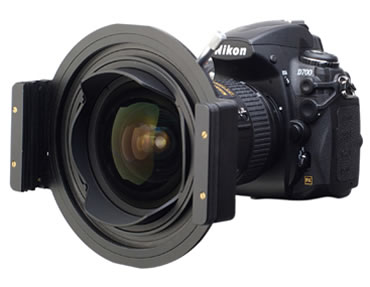
The first decision you’ll have to make is the type of filter you’re going to use. Will it be a circular screw on filter or a 100x100mm slide in option like the Lee Big Stopper. From my experience the slide in options prove to be the most convenient for use, even though the whole system may be less portable than its screw on counterpart. As you begin to use your 1o stop in real life situations, you’ll find that in all but the brightest daylight it becomes almost impossible to see the image through the viewfinder and that autofocus ultimately becomes useless. I’ll be talking a bit more about dealing with these challenges once we get into techniques, but for this reason it’s often necessary to take off the filter to compose and focus your image. With screw on filters this becomes a painful process and ultimately slows down your shooting. Having tried both the Big Stopper and a B+W 10 stop, I’d encourage you to go for the former for most shooting situations. The screw on filter is better if you’re trying to pack light and have no use for ND Grads and want to completely eliminate the chance of light leaks. They’re also a good alternative if most of your use will be in bright daylight and you don’t have to take it off for composition. For all other situation the Big Stopper definitely comes out on top. It offers a good blend of performance and convenience but do note that availability (as with most Lee products) can sometimes be scarce.
Once you’ve decided on a filter type, the next thing to keep in mind are some best practices when using them. Let’s first cover off some additional equipment that you’ll need to have to get the most use from your filter. The first is to utilize a viewfinder cover to prevent light for creeping onto the sensor (some higher end cameras have a switch on the viewfinder that will close it up). You may not think this is a common issue but with 10 stop filters it happens very often and can be identified as a purple haze in your image. The next thing, and one that is rather obvious is that you’ll need a very sturdy tripod and robust ball head, especially with heavier lenses and bodies to ensure a sharp image. If you have a tripod that has a hook at the bottom of the centre column then be sure to hang something off it to provide a more stable platform. Finally a remote shutter release with a timer will help a great deal. As shutter speeds will often exceed 30 seconds, it’s important to be able to throw your camera in bulb mode and let the remote handle the timing of your shutter for you.
As I eluded to earlier, autofocus and composition can become tricky as the light begins to dim. In daylight you can often reveal the viewable area by switching to Live View and setting a wide open aperture. If this doesn’t help then removing the filter, composing the shot, and re-attaching it is your only real option. As far as autofocus is concerned, I typically throw the lens into manual and use the focus distance window on the lens barrel to set the focus to the estimated distance. Since the 10 stop is commonly used in combination with a wide angle lens and small aperture, setting focus for a midpoint distance or even setting it to infinity will usually result in sharp shots.
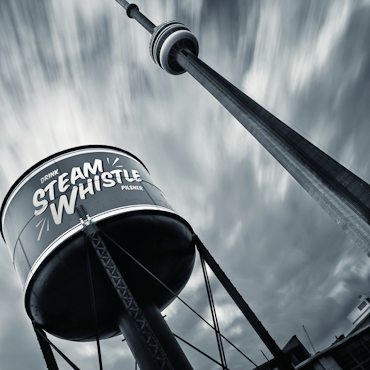
When deciding whether to use a 10 stop or not, it’s important to assess the conditions that you are working with. While a very windy day can provide a great deal of motion in the clouds, it will also create a lot of bobbing in your camera body (particularly with larger lenses) and often result in blurry shots. It’s often best to find a day with moderate and steady wind or find an area that provides some cover from it. Similar problems occur when shooting seascapes which I recently encountered. Given the nature of the shores in California where I was shooting, getting the desired shots involved me standing knee deep in tides that continually swelled and caused motions in my tripod. In this situation, the only thing I could do was opt for a shorter shutter speed so that I could capture my shot in between the tides. To further frustrate things, I put on the massive hood that my Nikon 24-70 f2.8 comes with to protect the filter from splash, but this created more wind resistance thus leading to vibration in my camera from the moderate winds. What I’m trying to emphasize here is that using 10 stops is a game of patience and trial and error. Expect to throw away a lot of shots and experiment with your shutter speeds to match the conditions you’re working with. If your plan is to shoot a lot of seascapes then my suggestion is to work with a 6 stop as opposed to a 10 stop. During golden hour the 6 stop will give you a good amount of shutter speed flexibility and allow you to compose your shot without taking it off. For architecture shooting a 10 stop is more appropriate as conditions are typically more friendly and you’ll need to drag the shutter quite a bit to get a good degree of motion in clouds.