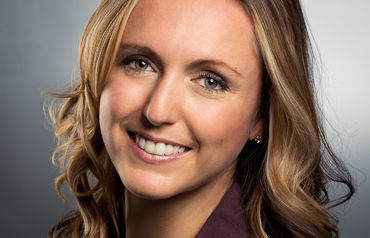
 Perhaps it’s just me, but I often stumble onto local studio photographer websites and am saddened by what I see in their portrait portfolio’s. I’m not referring to more arty or fashion oriented portraits as this is a different and much more subjective realm. I’m talking about a standard head shot that is meant to depict the person as they really are. The sort used by actors, a business person for their bio, etc. The image I shot here were for a real estate agent to use on cards, flyers, etc. and were never meant to be anything overly inventive or monumentally creative. They’re meant to show that person in flattering light, as they are, in a professional manner.
While I don’t claim to be an expert on the subject of head shot portraiture, on every shoot I aim to accomplish a number of things, and similarly, aim to avoid others. For this reason I’ve put together a list of do’s and do not do’s based on what I’ve noticed that people want in their photos, and some of which are just good sense and photographic technique. This is not intended to be a rant but rather an attempt to raise the bar for head shot portraiture, if only for a few people. Alongside this list I’ll also be discussing my technique for achieving a shot like this.
Do
Here is what I strive to do on almost every portrait of this nature (note these are not rules for fashion portraits):
- Have catchlights in the eyes to help bring them to life
- For women especially, get enough light into the eyes period, don’t let the brow cast too many shadows, therefore don’t put your main light up too high.
- Avoid harsh highlights on the forehead.
- Avoid deep shadows and high contrast.
- Shoot with a longer focal length (85mm-200mm on full frame) for a flattering compression.
- Related to the above, use a relatively soft light source such as a softbox, octa, or a beauty dish with a diffusion sock.
- Get your white balance right, use a grey card and fine tune from there to get pleasing skin tones.
- Separate the subject from the background. Don’t have a white shirt on white background or black shirt on a black background, or at least rim light or back light to create separation.
- Retouch the photo sparingly (see don’ts) but professionally. It’s hard to believe but I see portfolio pictures where the subject has acne spots. It’s your portfolio, spend 5 minutes cleaning up the skin. In addition, brighten up the eyes and teeth and do a quick liquify adjustment on unflattering areas.
- Invest time and charge accordingly for a quality result. The retouch for this photo took just over half an our without using any skin smoothing tools or plugins. You can hire a decent retoucher to do an edit like this for you for $10-$20/photo if you don’t want to do it yourself.
Don’ts
Photography is filled with exceptions to every rule but these are things I tend to avoid, but have sadly seen in portfolios:
- Use soft focus, glamour glow or overdone Gaussian Blur skin softening. If you don’t have time to manually clean up skin there are ways of speeding up the process without turning your subject into a soft mess (see my other post). This is probably the most common problem and I don’t think it’s going to go away soon.
- Have halos around your subjects head from excessive contrast correction.
- Blast the subject with frontal light or add so much fill that shadows disappear completely. Sure this is the easy way out as shadows have to be made flattering, but that’s your job as a photographer. Remember that light reveals but shadows define.
- HDR the photo. This may be OK for sports composites but not here.
- Use 1990’s style heavily lit blue or green muslin backgrounds (unless you want to make it look like a high school graduation photo). Grey seamless works great because you can easily change the color of it in photoshop (selective color adjustment layer on neutrals).
- Edit out defining features like beauty marks, freckles, etc. unless the client asks you to.
Now that we’ve covered off those points, let’s look at how this photo was shot. This was a  three light setup with two 400w Elinchrom strobes and one Nikon SB-910 speedlight. The key light is a 17″ white Elinchrom beauty dish with a diffusion sock over it with the strobe at 1/2 power. If shooting an older subject you’ll want to move towards a softer source like an Octa or softbox. The accent light is 14×35″ Elinchrom strip light with the strobe at 1/3 power. Finally the background light is the Nikon SB-910 with a Honl speed grid at 1/32 power. The positioning of each light can be seen in the diagram on the right and all lights were triggered via an Elinchrom Skyport. Camera settings were 200m, 1/200, f/11 at ISO 100 and the photo was shot from a slightly elevated position to emphasize the eyes.
As far as post processing goes, it was my usual workflow of adjusting exposure, contrast, fill light and blacks in Lightroom, then off to Photoshop. Some light skin retouch with clone/stamp, patch tool and spot healing, brightening the eyes and teeth via a masked exposure adjustment layer and sharpening the eyes with smart sharpen. Even if the client won’t pay for dodging and burning I’ll spend 5 minutes on it as it gives the photo a much more polished feel and adds a bit of depth. I finished up by using a selective color adjustment layer to make the skin tones a bit more pleasing and added a slight vignette.
With head shots it’s quite easy to develop a fairly repeatable formula for making the shots look good but, this can prove to be detrimental as well. Where it fails is if people adopt a formula that is flawed and never fix it, or simply become complacent and believe that portrait styles are static. It’s important to remember that as time goes on, trends change and people will want a different feel from their photos and as a photographer you have learn to cater to those needs. Sure everyone will have a signature mark that they put on their photos and that’s important for differentiation, but I can only hope that one of the ‘Don’ts’ doesn’t end up serving as that mark.