 Having recently done an in studio dance shoot, I can say without hesitation that dance photography will test your creativity and lighting prowess. If photographing on location, dance photography can be done with great success using little more than one light or no lights at all. The location allows you to juxtapose the softness or edginess of a pose against the dancers surroundings and the lighting becomes secondary. In the studio however, the lighting is what makes or breaks the shot, as all you have is a dancer and a couple of walls. In addition to the positioning and power of the lights, there are also other considerations such as flash duration, light color, fall-off, shadow casting and flare reduction that need to be thought through. In this post I’ll cover two popular light setups and go over some essential gear you’ll need for a successful shoot.
Let’s get the fun and expensive part out of the way first; the gear. Sadly dance photography is one of those fields that require more specialized light shapers and tools than a typical portrait shoot will. Some essentials include flags (cutters, gobo’s, whatever you want to call them), reflector grids, egg crates, strip lights, snoots, gels, tall light stands, wide seamless, and flashes with short flash durations (sometimes).
- Flags: since dance photography is all about light control, not only will you be creating light, you’ll also need to block it. Flags/Gobos will allow you to reduce the amount of light scatter you get as well as control the light fall-off across the subject, ground or background.
- Reflector grids: while soft light sources are still used in dance photography, you’ll often find yourself using hard light sources more often than you would in portraiture. Grids allow you place the light right where you need it and keep it from creeping into your lens as flare. A 30 degree reflector pan with 3 or 4 grids from 22 degrees through 12 degrees should suffice.
- Strip lights: a commonly used technique throughout dance photography is to run a line of light across the subject and strip lights accomplish this wonderfully. They’re also much more controlled than an Octa or softbox while still providing relatively soft light and can be further sharpened with the use of an egg crate.
- Snoot: nothing allows you to target a spot of light as well as a snoot. Most snoots come with an optional grid attachment that narrows the light to around 8 degrees and can be very useful for lighting backgrounds or highlighting a cheek or arm.
- Gels: once again, dance photography gives you the latitude to be a bit more unconventional with your lighting so adding pops of color to your lights is a great way to add drama to a shot. Rosco makes inexpensive and good quality gel sets that can simply be gaffer taped over your reflector or snoot. Take care to avoid running your modelling light at high power in combination with a reflector or snoot as they can get very hot and the gel can melt.
- Tall stands: you’ll often find yourself hiking your lights up much higher than in a portrait, particularly if you want to cast some interesting shadows so be sure to have a couple of stands that go up at least 12 feet. A boom arm is also very useful for achieving the lighting you want without having the lights in your frame. A C-Stand achieves all this at a modest price.
- Wide seamless paper: if you plan on using a seamless as a background, be sure to go for a 10 or 12 foot roll as the standard 6 footer will be insufficient and cost you a lot of Photoshop work in post.
- Short flash duration strobes: while not critical, a short flash duration allows you to freeze motion if you are incorporating fast movements or jumps into your photos. The most high end packs will have flash durations of 1/20,000th of a second but cost as much as a car and are mostly for specialized purposes. More affordable solutions like the Elinchrom Quadra Ranger can be had for a fraction of the price and have durations of approx 1/5,000th of a second which is more than sufficient for jump shots. Regardless of what you’re using, check with the specs on your flash to determine the power rating that gives you the shortest duration and expose for that. Some strobes are shortest at low power while the Elinchrom Quadra for example is shortest at high power.
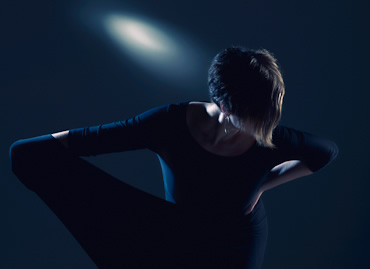
Now that we’ve gotten some of the most common tools out of the way, let’s take a look at how the above shot was lit (see the below lighting diagram).

As you can see, the above shot incorporated a good number of the tools that we described above with all settings noted on the diagram. In my case I didn’t have an egg crate for the strip bank so a cutter was placed behind the light to reduce spill on the background and another was placed below to keep some of the light off the floor. The gridded light was placed up high and aimed sharply down while the strip bank was vertical at body height. It’s worth noting that the lights were kept quite far away from the background to avoid lighting it excessively. The settings on the camera were f/11, 1/200th at ISO100. Post processing took about 10 minutes and involved cleaning up some visible lights or flags with Photoshop CS6 content aware fill and cross processing the colors using Nik Color Efex Pro 4.
Another setup that I like is what you see below. This configuration will create a beautiful profile light along the model and you can vary the degree of lighting by moving the model from directly in front of the key light, to just ahead of it. The further ahead you place the model, the narrower the band of light around them will be.

Although not clearly evident in the diagram, the horizontal strip bank is above the model on a long boom arm and pitched slightly forward. They’re not shown in the diagram but you also want to use a good number of flags in this setup to control spill. Ideally, place one flag on either side of the overhead strip bank and one below the key light. You’ll have to experiment with the lighting ratios to achieve a nice balance but the overhead light will generally be at 2/3 of the power of the key light. The accent light is optional but can be used to add a little highlight to the back if needed.
There’s a whole lot more to dance photography and this post was meant to merely get you started and acquainted with some of the tools you’ll need. If you’re serious about dance photography then Kelby Training has several courses that cover a broad range of topics so take a look at some of Joe McNally’s and Frank Doorhof’s videos for more in depth coverage.
A big thanks to my dancer Aviva Fleising and my friend Roland Shainidze for helping out on this shoot.